
This is the third in my series of posts on photography. In my first two posts I focused on the equipment and technical aspects of photography. For this post I’ll focus on the artistic aspect of photography often called composition.
What I love about photography is that the equipment, the technical and the artistic aspect of making great photos are all equally important. Over time the technical and equipment aspects become second nature which frees up your mind to focus on the creative side of photography.
When I first started to get into photography about 10 years ago, I remember struggling to find interesting subjects or what I call “seeing” the subject. Over time what I learned is that the more you learn about photography and composition, the more you see interesting subjects all around you. You start to recognize shapes, patterns, curves, interesting ways the light impacts a scene and so much more. Improving photo compositions takes lots of practice, trial and error and feedback from others. I strongly recommend taking photography workshops that focus on critiquing your images. I believe workshops helped me improve my images over time. If you can’t afford workshops, take a photography night class at a local community college. Most offer continuing educations courses. If that’s not an option find a friend whose work you admire and go shooting with them. Have them look at your compositions and give feedback. Share your work online and ask others for constructive criticism, particularly those whose work you admire. If you don’t ask for feedback it will be very difficult to learn and improve.
Often what I see in many images posted online is what I call “documentation” shots. People tend to see an interesting subject and snap a photo without composing. Often what they “saw” that drew them to take the photo just doesn’t come through as compelling or there are so many distracting elements in the photo that it’s hard for the viewer to see the subject. Some of the challenge is many who take photos don’t understand or haven’t yet mastered some of the technical aspects of photography. There are simple practices you can use to improve your compositions. These practices will help to reveal the subject and your personal experience of the beauty or interest that compelled you to take the photo. If you learn a few of the techniques below and use them in combination with some of the technical mastery I discussed in my last post, I promise you will see dramatic improvement in your images.
Every time you lift the camera to take a photo you should be thinking through a few things. Over time these will come naturally but when first starting out, it’s ok to say them in your mind (or out loud if you don’t mind people hearing you talk to yourself). Subject, Light, Background, Edges and Exposure. Each of these areas deserve an entire blog post but I want to keep it simple for now so I’ll just share a few tips.
First I’m going to tell a little story. I recently posted an image on a Facebook photography group that garnered some attention. I took this photo nearly 10 years ago when I was first getting serious about photography. I was on a week-long photo workshop in Door County WI. The subject was an old tree in a cemetery during the peak of fall color. At first, I just composed a typical shot which captured the entire tree in its setting. It wasn’t a bad photo but it was uninspiring. It captured the brilliant yellow in the leaves and the enormity of the tree, but it still didn’t inspire me. I wasn’t capturing the drama of this old tree that probably sat there for a hundred years through hard winters, hot summers, beautiful falls as people came and went, lived and died. I stood staring at this tree for 10 minutes and Lou (the workshop instructor) walked up and said, “Yes! That’s a great subject. Let’s see what you have.” I showed him my shot of the tree. He’s said, “that’s a good start. Tell me what is drawing you to this subject.” I told him the enormity and grandeur of the tree and brilliant color. I also like the strength that I see in the trunk and main branches. Lou suggested getting in closer on some of those details. This is what is call “working” the subject. I walked up to the tree, right to the base and looked at the texture of the bark. It had this mixture of green and brown and rough texture that really showed the age of the tree. Then looking up from the base I noticed how the main branches appeared to have a human like quality of reaching up and away like a composer waving his arms out to his orchestra. (Side note, I did a Google image search of my image years later and the result that came back was “Best guess for this image: Musical composition” so I feel validated on my impression of the composition). It was an odd thought but it stuck with me and drew me to focus on that aspect in my composition. I leaned up against the trunk of the tree and composed a few different shots up into the branches of the tree to try to capture the structure in the tree. I tried a few different angles along the base. Below is a series of photos leading up to my final selection. As you can see, I went through trial and error working the subject before coming to a composition that I liked. I literally had dozens of images but showing a few below. You can click-through to see the detail of my progression in working the image.


I share this story because it was an epiphany for me. It’s when I first realized that photos that inspire people often have a dramatic perspective and getting that perspective just right requires experimenting with the subject with many different angles. Often these compelling photos will have odd angles, high or low perspectives or even zoom in on small details. I tell this story because I feel very strongly that working your subject and really thinking about what moves you about the subject will help you refine your composition to focus on the elements that capture what you “see”. Working a subject can feel awkward at first, as it did for me, but as you do it more it will become second nature. Never accept that first shot as your only image. Force yourself to spend time with a subject before moving on. I promise you’ll be glad you did.
Now on to the tips!
Positioning your subject When it comes to your subject, consider positioning it off-center. Positioning the subject off center provides more interest. Now this isn’t a rule, but a general guide. There are certain circular subjects that look best centered (like a sun flower). In the above photo you can see I positioned the trunk to the left. I did this on purpose to give the branches room to flow up and to the right through the frame as this was their natural flow. Positioning this way allows the viewer to come into the photo from the strong base and be led up into the big yellow canopy and the strong branches which lead you up and to the right. In any composition you want to have purpose in how you lead the viewer through the photo. It should have a natural flow. Give your subject room in the image. Consider how close your subject is to the edge of the frame. If it’s a moving subject consider placing it so it has room to move through the frame. If the subject is naturally pointing in one direction place it so that the subject has room move in that direction. In the case of the tree above, I positioned the base so that the branches which naturally moved to the right had room to flow throughout the frame to the right. Notice how I gave the top branch room in the frame, not too close to the top of the frame.
Vertical and Horizontal compositions Try both with every subject you shoot. You’ll be surprised. I tried a vertical with my tree shot but the trunk over powered and it cut off the smaller branches and how they lead to the right. It didn’t look natural. I settled on a horizontal as the best composition, but always try both. You’ll be surprised.
Placement of the Horizon As with keeping subjects off-center, when composing shots that include the horizon, avoiding splitting the sky and land equally in the frame. If you give one or the other more space, you draw the focus to the area of interest in your photo. If there is more interest in the sky, say dramatic cloud structure, consider including more of the sky in the frame. If there is little interest in the sky don’t include much, or in some cases, any of the sky. Again, this is not a rule but a guide. When shooting reflections there are some cases where you may want to split 50/50 to emphasize mirroring aspect of the reflection. This works best with smooth water. Also if you do include the horizon, particularly one with a hard line in the image, it’s very important to make sure the horizon is level. If it’s not level this will be very obvious to the viewer and draw attention from your subject. As with all of these guidelines experiment with different compositions. Have fun with it!
Lines, shapes and patterns In nature, and the man-made world, you’ll see patterns, shapes and lines everywhere you look. You can use these to provide interest in a photo and to lead the viewers eyes through the image.
Curves and leading lines Notice in the below photo how the tree line on the left “points” to the mountains. The shore line on the right forms a curved line leading to the mountains in the distance. Think about composing your photos to use natural curves and leading lines.
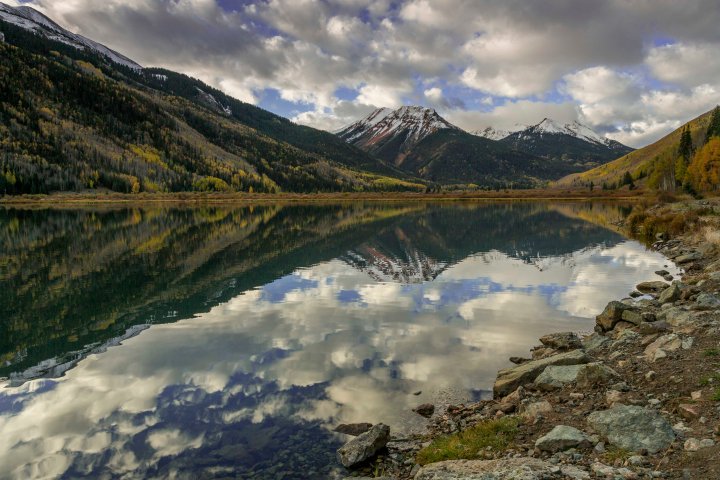
Layers In landscape photography layers are natural patterns you can see in nature. Notice how you can use the natural color and tree line to create a layered pattern that “steps” you through the photo.
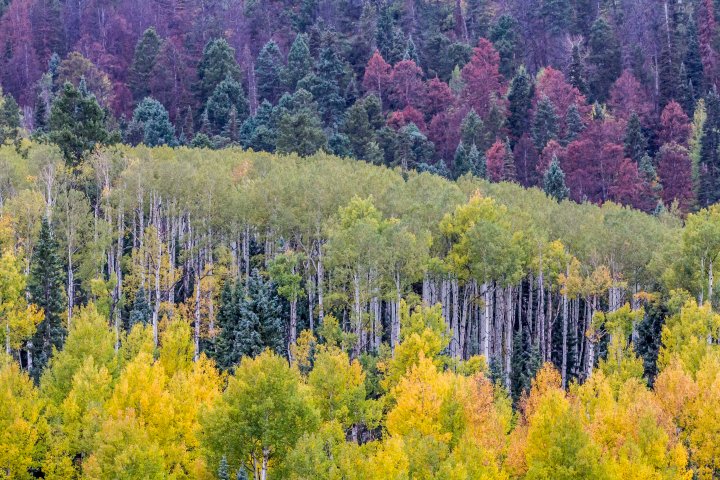
Shapes See how the groups of trees on the left, right and bottom each form a sort of triangle that points to the sky. You can use shapes to lead the viewer’s eye through the frame.

Repeating patterns. You can find patterns all throughout nature. It’s best to fill the frame when shooting repeating patterns.

Light. In photography, light is everything. Without it there is no photography. But, there are different types of light. Light can transform a composition from just ok, to an amazing photo. Often you’ll get the most compelling photos shooting at what is called the “edges of light”. This means early morning when the sun is just rising or at dusk when the sun is setting. The reason light is best at these times of day is due to the direction and intensity of the light. Sun light is softer and at a lower angle to the earth at these times of day. I see many photos of subjects which are shot in the middle of the day with bright sunlight. Often they look harsh with too much contrast between dark and light areas. It’s also very difficult to get a good exposure between the light and dark areas when shooting in bright sunlight. Cameras have limitations. They cannot differentiate between extreme light and dark the way the human eye can. This is why when you shoot in bright daylight the camera has to make a trade-off to either capture the dark areas with proper exposure or the bright areas. If you capture the dark areas, then the sky and highlights are often blown out white with no detail. If you properly expose the sky then the dark areas are full black with no detail creating a “contrasty” photo that doesn’t look natural. There are situations where this is unavoidable and there are techniques that can help, but your best way to capture good photos is to shoot at the edges of light to get an even properly exposed photo. This takes dedication as often you are getting up before the sun rises when everyone else is sleeping or you are shooting at sunset when the family is just sitting down to dinner or getting ready to go out. It is a sacrifice to shoot at the edges of light and takes dedication.
Direction of light. The direction of light can have a big impact on your compositions. When composing your photo think about the direction of light and how it can positively impact your subject.
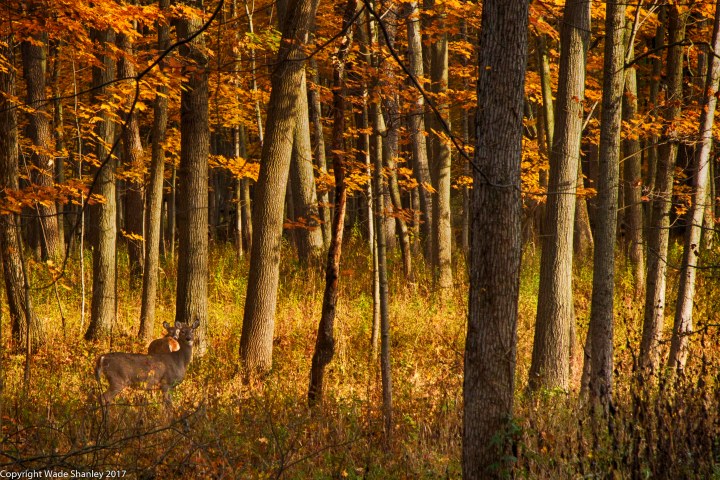
Side lighting This is when the light is coming from one direction. Side lighting can create a soft contrast between light and dark on your subject and provide a “mood” to the photo. You can use side lighting to show texture in your subjects through the use of shadows an shading to emphasize texture in objects. In the below image I used side lighting to show the early morning mood of this fall setting. Notice the contrast between light and dark on the tree trunks which illuminate the detail of the bark. The leaves also pick up some translucency.
Front lighting This is when the sun is directly illuminating your subject, coming over your shoulder. I particularly like this for sunsets. Front lighting can reveal color in subjects and create interesting shadows and lines.

Rear lighting This is when the sun is coming from behind your subject. This type of light allows you to capture translucency of subjects. It can also be used to show the definition of a subject. This is fun to experiment with and one of my favorites.


Diffused light Diffused light is filtered either through the clouds or fog. Useful when shooting close up subjects or when you want a softer more balanced light on subjects. The below shot was on an overcast day which allowed me to use a slightly longer exposure to reveal the green in the forest floor.

Background and Edges. Generally what you are looking to do here is simplify and remove distractions from your compositions. As I noted above I belong to a number of photo groups and see photos from people from all over the world. I often see posts of an interesting subject with tons of distracting elements in the photo, a house in the background half in and out of the frame, telephone lines cutting right through the photo in the foreground, part of a sidewalk or road that’s neither in or out of the photo. It makes me cringe, but I know that the person taking the photo can’t see these distracting elements because they are blinded by their subject. When I first started shooting 10 years ago, my pictures were filled with distractions. I still struggle with it to this day. We all get super focused on the subject which causes us to miss all the distracting elements in our photos. The human brain naturally ignores distractions which makes it hard for you to see distracting elements when composing. Photographers need to retrain the eye to see these distractions when composing images. Over time you will get better at this, but start with using the tools of your camera. After taking each photo look at the LCD and use the zoom feature on the camera to zoom in on the image you just took and move around all the edges and look for distracting elements. Look at the background for any distracting elements and work to recompose to remove those distractions. Often you can crop out distracting elements in post processing, but it’s best to get the composition right in camera before you get back to your computer. If you are having trouble seeing the LCD, I recommend purchasing a Hoodman Loupe. It’s a small device you hold up to the LCD, like a viewfinder, that blocks out the light.
Distracting background Be aware of bright objects in the background or foreground that can distract from your subject. This can be a bright-colored object or even the sky itself. The eye is naturally drawn to bright objects. Just look at your images with a critical eye beyond your subject and you will see the distractions. A good way to see some of these distractions is to squint at the composition on your LCD, or to stand back away from the LCD and look at the composition. When you do this the key objects in an image will standout including the major distractions. If you squint at the image on the left you’ll see how your eye is drawn to the bright sky in both the top and bottom of the image which in this case adds nothing to the photo. Best to recompose to remove it (image 2)


Check the edges Watch for objects coming into the frame from the edges. Below is an example of a city shot I took more than 10 years ago. As you can see I was so interested in the architecture of this building that my eye could not see the gigantic pole sticking straight into the image! A simple fix would have been to recompose this as a vertical shot to focus on the building in the center. If that didn’t work I could have tried to move to the left to get the pole out of the image.

Exposure Again one of the more tricky things to master in photography is proper exposure. This falls a bit into the technical area but can have a significant impact on the quality of your compositions. One tool in your camera that will help you with proper exposure is called the Histogram. The histogram shows a graphic display of where all the pixels in your image fall in the light spectrum from dark to light. You can typically access the histogram by hitting the “info” button on your camera when viewing the image you just took. While it’s not a foolproof way of getting proper exposure, reviewing the histogram can give you a clue if your image is over or under exposed. Below is a simple example of a view of the histogram with normal exposure, overexposed and underexposed image.
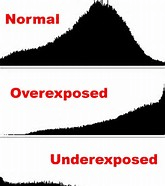
Most photos won’t be displayed as clear cut as this as you will often have a range of dark and light areas in a photo. The most important thing you want to avoid is full black (a hard line on the left) or full blown out white (hard line on the right). Again, there are exceptions to this rule. There may be cases where you want some areas to go completely black, but in most cases you want to retain detail in the light and dark areas of your images so they look more natural. Again this takes practice and experience. Another tool that can help is the “Highlight Alert” setting in your camera. Usually found in the menu settings, turning this on will display a flashing on your image on the LCD in areas that are over or under exposed. This alerts you that you need to adjust your exposure and can be a good tool to remind you to check your exposure. Again, look at your images with a critical eye and work to get proper exposure in your images.
AEB (Automatic Exposure Bracketing) In some cases it will be difficult or impossible to get a proper exposure from light to dark depending on the range of light in your scene. Remember, your camera has limitations and can only capture a limited range from dark to light. The human eye can see significantly more detail than your camera can capture. You can compensate for the shortfall in the camera by Exposure Bracketing. You can find this setting in your camera menu referenced as Exposure Compensation or AEB (Automatic Exposure Bracketing). When you turn this on you can set the camera to automatically take a number of photos at different exposures. You can decide to take a range of photos but typically 3 photos is sufficient, 1 photo at zero (0) or no exposure compensation, 1 photo over exposed (+1) and 1 under exposed (-1). You can set the amount of over and under exposure by full stops or partial stops (usually by as little as 1/4 or 1/3 of a stop) depending on the range of light to dark in the scene. I usually start with a 1 stop over and under exposed. Again, this takes some experimentation and practice. Using Exposure compensation allows you to capture a range of photos so you can choose the best exposure when you return to your computer. I personally only use this when shooting in difficult lighting situations or when I know I might want to blend multiple images into an HDR (High Dynamic Range) image (more on this in a future blog).
I hope these tips are useful. If you have any questions feel free to comment or reach out.
