
This is the 2nd in my series of blog posts on photography. In my first post I discussed photography equipment and some tips and pitfalls to avoid. In this post I’ll focus on basic technical aspects of photography which can positively impact your photos.
The saying goes “even a blind squirrel finds an acorn once in a while”. If you don’t know how your camera works, this pretty much summarizes your chances of getting a great photo. If you really want to take your images to the next level, you are going to need to understand some basic technical aspects of your camera and how they impact your images. For the purposes of this post I’m going to assume you have a Digital SLR camera or Mirrorless Interchangeable lens camera.
There are many technical areas we can explore in photography. For this post I’m going to focus (pun intended) on 3 key areas: Light sensitivity (ISO), depth of field (Aperture) and shutter speed. The most important thing to understand is that all 3 of these are interrelated when it comes to how your camera operates.
First lets review a few terms. ISO refers to the light sensitivity of the image senor in your camera. Aperture refers to the diameter of the opening in your lens which impacts light reaching the sensor. Aperture also impacts depth of field or how sharp objects appear in an image from near to far. Shutter speed relates to how long the shutter is open (or sensor is exposed) which impacts light hitting the sensor as well as the sharpness of objects in the image. We’ll explore each of these in more detail below.
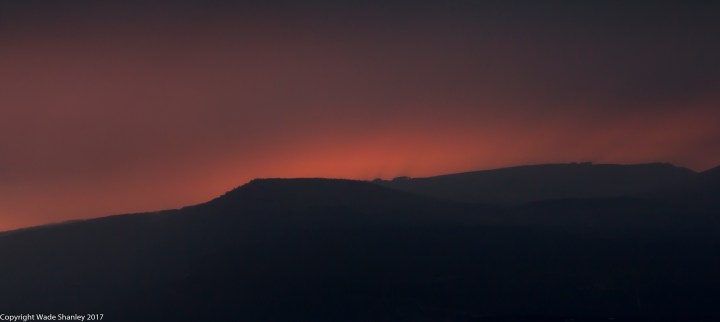
ISO: This term pre-dates the digital era where you could purchase film which had a specific light sensitivity or ISO. In today’s digital era, light sensitivity is manipulated by adjusting the ISO setting on your camera which impacts the digital sensor’s sensitivity to light. Grab your camera and take a look at the buttons on the top. You should see a setting for ISO on the top of the camera or in the menu settings. Depending on your camera model you can adjust this setting somewhere between 50- 64,000 or even higher in high-end cameras. For most photography you’ll adjust this setting to somewhere between 100- 6400. Higher ISO settings enable the camera’s sensor to be more sensitive to light, meaning it can accept more light to capture the image. Lower ISO settings are less light-sensitive but they provide sharper images. The downside of higher ISO is that it often causes something called image “noise”. The best way to describe noise is when you look closely at an image you’ll see graininess to the image…it won’t seem as sharp. Depending on the subject this may or may not be desirable. In the example below, there is noticeable noise but only as you inspect closely.
While it is possible to reduce “noise” in post processing you’ll want to avoid high amounts of noise in your images unless that’s a look your intend. Higher quality cameras manage noise better at high ISO settings. In lower end cameras the noise in images can become unusable at medium to high ISO settings. This is something you’ll see discussed in camera reviews and is worth considering if you expect to shoot in low light situations.
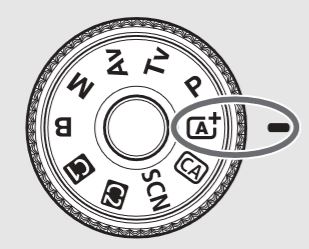
Adjusting settings such as Shutter speed and Aperture etc. Again take a look at your camera. You should see a dial with markers for Aperture and Shutter priority. The names of these settings will vary by manufacturer. On a Canon camera you should see something like P (Program mode), A (Intelligent Auto) , Av (Aperture priority), Tv (shutter priority), M (Manual) and there may be a few more settings like B (Bulb) and C for custom which I won’t cover here but should be covered in your camera manual.
A (Auto Mode). Fully Automatic mode. This is generally what many photographers refer to as the “dummy” mode. Not meant to be derogatory but essentially you aren’t controlling the camera in these modes. The camera is making all the decisions about settings. The camera looks at the scene and evaluates the situation and adjusts the ISO, Speed, Aperture, focal point and flash based on algorithms programmed into the camera. If you don’t care to know anything about your camera or creative photography, this is your no thought point and shoot setting. Your creative options will be limited in this mode. side note: this is the only mode where the flash will typically pop up automatically if the camera detects underexposure in the scene.
P (Program AE)– similar to the fully Automatic mode, but you get to control a few more items like flash, focus point, drive mode etc. The camera will still fully control Aperture, Shutter speed and ISO so it’s 1 step closer to allowing you to make more decisions about your creative options.
Tv (Shutter Priority)– Setting the camera to Tv allows you to manually control shutter speed and the camera will automatically adjust aperture to try to get a properly exposed shot. You’ll want to use this setting when you want to control the amount of time the shutter is open to get a stop action or a deliberate motion effect in your images. Some cameras will allow the shutter to remain open for as short as 1/8000 sec to as long as 30 seconds (these settings may vary based on camera model). In general if you want to “stop” the action you use higher shutter speeds. For example if you are shooting birds in flight, sports action or something where you want to capture that moment, using shutter priority will be the way to go.
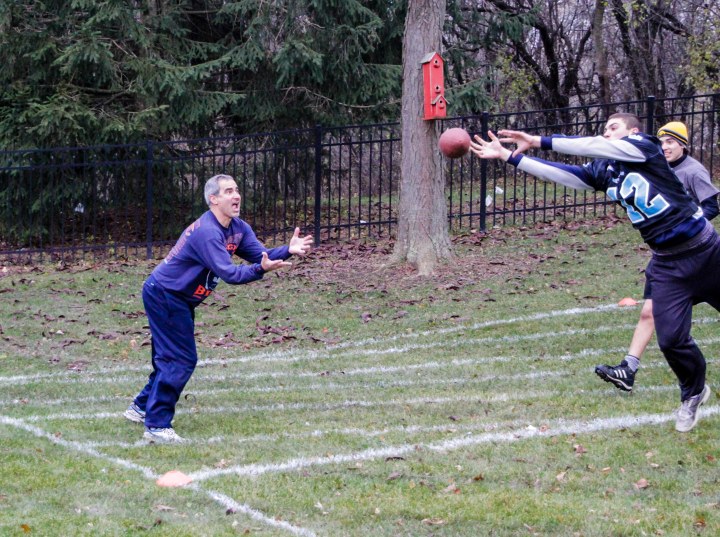
Tip: often when shooting in Shutter priority, you’ll want to use the “Drive” setting to capture continuous images at high-speed as you hold down the shutter button. This allows you to shoot quick successive images of action and in post processing select the sharpest or most appealing image out of the many taken. This is more important when shooting action shots.
Shutter priority is a really fun setting to get creative images. While most photographers use this setting to capture crisp action shots, you can purposely slow the shutter speed to blur action to get a creative effect in your image. Have you ever seen a city night photo where the car lights are a blur trail of light and the rest of the city is in sharp focus? You can get this effect with a slow shutter speed. Depending on the speed of the cars you can adjust the shutter speed to a fifth of a second to a few seconds or longer to get these long trailing lights. Longer shutter speed = longer light trails.
Have you ever seen travel shots where there is one person standing in a busy bustling crowd and that one person is in sharp focus while the crowd is a blur? Again, a longer shutter speed will blur moving objects but still objects will remain in sharp focus giving you a cool dramatic photo.
Panning is another fun way to experiment with shutter speed. Panning is where you move your camera to follow the subject as you shoot. A simple illustration below shows when you pan at a relatively slow shutter speed, the background blurs with motion while the subject stays in relative sharpness. The net effect emphasizes the motion of the subject. In the example below I shot at a relatively slow 1/30 sec shutter speed. If I shot this at 1/500 sec the girl would be “frozen” and you lose the impact of her motion. The blur can tell a story.
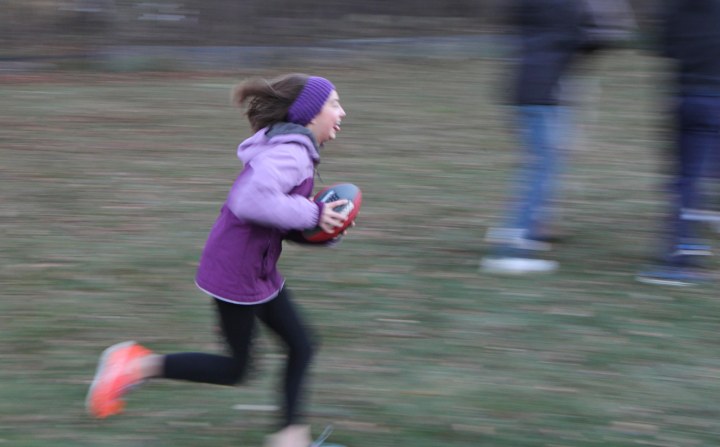
Panning takes a bit of practice and experimentation with different shutter speeds but provides amazing results when you get it right. Tip: consider using AI -Focus to help the camera focus on the subject as you (pan) move the camera. I encourage you to experiment with shutter speeds as the creative possibilities are limitless.
Av (Aperture Priority)– As a nature photographer, this is my favorite setting and my default in most situations. Just like in Tv when you set your camera to Aperture priority, you control the Aperture setting and the camera will automatically adjust the shutter speed to try to capture a properly exposed image. Changing the Aperture adjusts the F-stop or amount of light which reaches the sensor. It also manipulates the Depth of Field or how in focus your background is in the image. A lower F-stop number (i.e.: F 2.8, F4) creates a narrow depth of field or more out of focus background. Adjusting (Aperture) allows you to draw focus on a subject to direct the viewer’s eye. Narrow depth of field also allows you to put distracting backgrounds out of focus.

To get a good understanding of depth of field do a quick experiment. Go into your backyard with a friend and have them stand 10 feet away from you. Take a series of photos of them where you focus on their face but adjust the Aperture on your camera through the range of F-stops from lowest to highest for each successive image. Download the images and review them on your computer. What you’ll see is as you move through the images is that the background will become more in focus as you move to higher F-stop settings (F11, 13, 14, 16, 18 and so on). There are cases where you may want the entire image in focus so you’ll choose a higher F-stop, say for a wide-angle landscape of the mountains and a meadow. In other cases you may want to blur out districting background elements, for example a close up photo of a single flower. Experimenting with Aperture and depth of field is really fun and will help you make some really creative images.
M (Manual Mode): Some photographers choose to use the M (Manual) mode so they can manually set shutter speed, aperture and ISO to get the effect they are looking for. This is a popular setting for photographers who learned to shoot on film cameras because for many years Manual was the only way to shoot film. It’s worth trying Manual mode to get an understanding of the relationship between Aperture, Shutter speed and how adjustments impact exposure etc. Keep in mind, in this mode the camera lets you make mistakes because you are now fully in control of all the settings. So if you set the Shutter Speed too slow and the Aperture too large you are going to get a blown out overexposed photo because too much light will be hitting the sensor for too long. The camera won’t “fix” it. You are going to have to manually watch the exposure when shooting in this mode. Personally I find focusing on one aspect (say Av or Tv) and letting the camera adjust the other setting allows you to focus more on the subject and creative aspects of the image to get the effect you desire. That said it is worth experimenting with M mode to see what it’s like to completely control all settings.
The relationship between ISO, Shutter speed and Aperture. When you first start out with photography, the most challenging technical aspect of the camera is understanding the relationship between these settings and how they can positively and negatively impact your images. Lets review some examples to illustrate the relationship:
For this scenario lets assume you are shooting in Av (Aperture priority). As you increase the Aperture (lower F-stop number), more light reaches the sensor. So in effect the shutter speed will be adjusted in order to get a properly exposed image. For example if you set your camera to the lowest F-stop number for your lens (say F 2.8) which is the largest aperture…more light will be let onto the sensor meaning the shutter speed will need to be faster in order to get a proper exposure (not over exposed). So if there is a lot of light in your scene (full daylight), the camera will increase the shutter speed to compensate for all the light, which will cause action to be stopped in your image. If you are trying to get a blurred effect and there is a lot of light in the scene you will struggle to get that effect with a low F-stop number (as an example the person in the crowd I mentioned above). You can manipulate a few other settings to help to “slow” the image. You can decrease the F-stop (higher number), decrease the ISO, (light sensitivity). You can also use a polarizer or neutral density filter to limit the light reaching the sensor. The net effect will allow the shutter to stay open longer giving you the blurred motion you desire.

The same works in reverse. Say you are using the Tv (shutter priority) and you are trying to shoot an action shot in a low light gymnasium at a sporting event. As you increase shutter speed to capture action, it’s going capture less light to the sensor. By default the camera will try to increase the Aperture (lower number) to let in as much light as possible to capture a correct exposure. If your camera and/or lens can only go to say a max aperture of say F 5.6 (common in a telephoto lens), the image may come out under exposed and/or blurry because the camera can’t capture enough light to stop the action. There are some adjustments you can make in low light situations to help get more light to the sensor. One of them is to increase the ISO. If you recall, a higher ISO will make the sensor more sensitive to light, but the downside is noise. So in the above case you may be able to increase the ISO to say 1600 or higher and you may be able to stop the “blur” in your action shot, but the downside is you may get more “noise” in the image. So the capability of your camera and lens can, in extreme cases, have an impact on image quality. This is where photographers often invest in higher quality camera or lenses which can provide better results at the extremes of light.
Low light also has an impact on sharpness of subjects. If you need to shoot at slower speeds in low light any camera shake will cause blurriness in your photos. A tripod or monopod can help you stabilize the camera. Cameras and lenses with vibration control features can also help in these low light situations where you can’t use a tripod, but there are limits. Also you often can’t control motion in your subjects… so the only way to prevent a blurry subject is to have a faster shutter speed (or a powerful flash, which may not be practical or allowed depending on where you are shooting). Generally, shutter speeds of 1/250 sec and higher will allow you to get stop action depending on the speed of the subject. A good rule of thumb is that 1 over the focal range of the lens is typically what you can handhold and still avoid camera shake. So for example if you are shooting a telephoto lens and you are zoomed out to 200mm, typically the slowest shutter speed you can shoot handheld is 1/200. As noted above vibration reduction lenses will help at slower shutter speeds, practice will help in this area as well.
To summarize, you can manipulate the Shutter speed, Aperture and ISO to help you get the desired effect in your photos. If you are shooting an image and not getting the result you expect, consider these 3 settings and where you can make adjustments to get the result you desire.
In my next blog post I’ll tackle a few other areas such as exposure, exposure bracketing, white balance, HDR, the histogram and other technical tips and tricks. Stay tuned.

One thought on “Learning the technical aspects of Photography”